No he terminado aún... pero despues de "liarla parda" y borrar particiones archivos y todo.... estoy recuperando todos los ficheros de una tarjeta SD.
Os dejo los pasos.... están en inglés.... pero seguro que no os resulta complicado..... Suerte.
.........................
There are lots of utilities to recover deleted files, but what if you can’t boot up your computer, or the whole drive has been formatted? We’ll show you some tools that will dig deep and recover the most elusive deleted files, or even whole hard drive partitions.
We’ve shown you simple ways to recover accidentally deleted files, even a simple methodthat can be done from an Ubuntu Live CD, but for hard disks that have been heavily corrupted, those methods aren’t going to cut it. In this article, we’ll examine four tools that can recover data from the most messed up hard drives, regardless of whether they were formatted for a Windows, Linux, or Mac computer, or even if the partition table is wiped out entirely.
Note: These tools cannot recover data that has been overwritten on a hard disk. Whether a deleted file has been overwritten depends on many factors – the quicker you realize that you want to recover a file, the more likely you will be able to do so.
Our setup
To show these tools, we’ve set up a small 1 GB hard drive, with half of the space partitioned as ext2, a file system used in Linux, and half the space partitioned as FAT32, a file system used in older Windows systems. We stored ten random pictures on each hard drive.

We then wiped the partition table from the hard drive by deleting the partitions in GParted.

Is our data lost forever?
Installing the tools
All of the tools we’re going to use are in Ubuntu’s universe repository.
To enable the repository, open Synaptic Package Manager by clicking on System in the top-left, then Administration > Synaptic Package Manager.
Click on Settings > Repositories and add a check in the box labelled “Community-maintained Open Source software (universe)”.

Click Close, and then in the main Synaptic Package Manager window, click the Reload button. Once the package list has reloaded, and the search index rebuilt, search for and mark for installation one or all of the following packages: testdisk, foremost, and scalpel.
Testdisk includes TestDisk, which can recover lost partitions and repair boot sectors, and PhotoRec, which can recover many different types of files from tons of different file systems.

Foremost, originally developed by the US Air Force Office of Special Investigations, recovers files based on their headers and other internal structures. Foremost operates on hard drives or drive image files generated by various tools.

Finally, scalpel performs the same functions as foremost, but is focused on enhanced performance and lower memory usage. Scalpel may run better if you have an older machine with less RAM.

Recover hard drive partitions
If you can’t mount your hard drive, then its partition table might be corrupted. Before you start trying to recover your important files, it may be possible to recover one or more partitions on your drive, recovering all of your files with one step.
Testdisk is the tool for the job. Start it by opening a terminal (Applications > Accessories > Terminal) and typing in:
sudo testdisk

If you’d like, you can create a log file, though it won’t affect how much data you recover. Once you make your choice, you’re greeted with a list of the storage media on your machine. You should be able to identify the hard drive you want to recover partitions from by its size and label.

TestDisk asks you select the type of partition table to search for. In most cases (ext2/3, NTFS, FAT32, etc.) you should select Intel and press Enter.

Highlight Analyse and press enter.

In our case, our small hard drive has previously been formatted as NTFS. Amazingly, TestDisk finds this partition, though it is unable to recover it.

It also finds the two partitions we just deleted. We are able to change their attributes, or add more partitions, but we’ll just recover them by pressing Enter.

If TestDisk hasn’t found all of your partitions, you can try doing a deeper search by selecting that option with the left and right arrow keys. We only had these two partitions, so we’ll recover them by selecting Write and pressing Enter.

Testdisk informs us that we will have to reboot.

Note: If your Ubuntu Live CD is not persistent, then when you reboot you will have to reinstall any tools that you installed earlier.
After restarting, both of our partitions are back to their original states, pictures and all.

Recover files of certain types
For the following examples, we deleted the 10 pictures from both partitions and then reformatted them.
PhotoRec
Of the three tools we’ll show, PhotoRec is the most user-friendly, despite being a console-based utility. To start recovering files, open a terminal (Applications > Accessories > Terminal) and type in:
sudo photorec
To begin, you are asked to select a storage device to search. You should be able to identify the right device by its size and label. Select the right device, and then hit Enter.

PhotoRec asks you select the type of partition to search. In most cases (ext2/3, NTFS, FAT, etc.) you should select Intel and press Enter.

You are given a list of the partitions on your selected hard drive. If you want to recover all of the files on a partition, then select Search and hit enter.
However, this process can be very slow, and in our case we only want to search for pictures files, so instead we use the right arrow key to select File Opt and press Enter.

PhotoRec can recover many different types of files, and deselecting each one would take a long time. Instead, we press “s” to clear all of the selections, and then find the appropriate file types – jpg, gif, and png – and select them by pressing the right arrow key.

Once we’ve selected these three, we press “b” to save these selections.

Press enter to return to the list of hard drive partitions. We want to search both of our partitions, so we highlight “No partition” and “Search” and then press Enter.

PhotoRec prompts for a location to store the recovered files. If you have a different healthy hard drive, then we recommend storing the recovered files there. Since we’re not recovering very much, we’ll store it on the Ubuntu Live CD’s desktop.
Note: Do not recover files to the hard drive you’re recovering from.

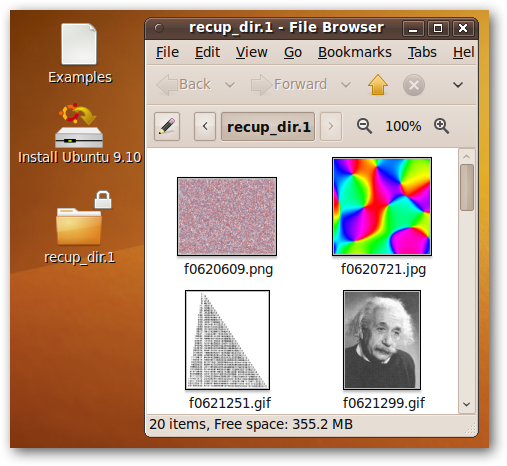
PhotoRec is able to recover the 20 pictures from the partitions on our hard drive!

A quick look in the recup_dir.1 directory that it creates confirms that PhotoRec has recovered all of our pictures, save for the file names.
Foremost
Foremost is a command-line program with no interactive interface like PhotoRec, but offers a number of command-line options to get as much data out of your had drive as possible.
For a full list of options that can be tweaked via the command line, open up a terminal (Applications > Accessories > Terminal) and type in:
foremost –h
In our case, the command line options that we are going to use are:
- -t, a comma-separated list of types of files to search for. In our case, this is “jpeg,png,gif”.
- -v, enabling verbose-mode, giving us more information about what foremost is doing.
- -o, the output folder to store recovered files in. In our case, we created a directory called “foremost” on the desktop.
- -i, the input that will be searched for files. This can be a disk image in several different formats; however, we will use a hard disk, /dev/sda.
Our foremost invocation is:
sudo foremost –t jpeg,png,gif –o foremost –v –i /dev/sda
Your invocation will differ depending on what you’re searching for and where you’re searching for it.

Foremost is able to recover 17 of the 20 files stored on the hard drive.

Looking at the files, we can confirm that these files were recovered relatively well, though we can see some errors in the thumbnail for 00622449.jpg.

Part of this may be due to the ext2 filesystem. Foremost recommends using the –d command-line option for Linux file systems like ext2.
We’ll run foremost again, adding the –d command-line option to our foremost invocation:
sudo foremost –t jpeg,png,gif –d –o foremost –v –i /dev/sda

This time, foremost is able to recover all 20 images!

A final look at the pictures reveals that the pictures were recovered with no problems.

Scalpel
Scalpel is another powerful program that, like Foremost, is heavily configurable. Unlike Foremost, Scalpel requires you to edit a configuration file before attempting any data recovery.
Any text editor will do, but we’ll use gedit to change the configuration file. In a terminal window (Applications > Accessories > Terminal), type in:
sudo gedit /etc/scalpel/scalpel.conf

scalpel.conf contains information about a number of different file types. Scroll through this file and uncomment lines that start with a file type that you want to recover (i.e. remove the “#” character at the start of those lines).

Save the file and close it. Return to the terminal window.
Scalpel also has a ton of command-line options that can help you search quickly and effectively; however, we’ll just define the input device (/dev/sda) and the output folder (a folder called “scalpel” that we created on the desktop).
Our invocation is:
sudo scalpel /dev/sda –o scalpel

Scalpel is able to recover 18 of our 20 files.

A quick look at the files scalpel recovered reveals that most of our files were recovered successfully, though there were some problems (e.g. 00000012.jpg).

Conclusion
In our quick toy example, TestDisk was able to recover two deleted partitions, and PhotoRec and Foremost were able to recover all 20 deleted images. Scalpel recovered most of the files, but it’s very likely that playing with the command-line options for scalpel would have enabled us to recover all 20 images.
These tools are lifesavers when something goes wrong with your hard drive. If your data is on the hard drive somewhere, then one of these tools will track it down!